In this tutorial, we will create an automation for the following process:
- Supplier情報を含むスプレッドシートのデータを新しいシートにコピー。
Copy the data in a spreadsheet with supplier information to a new sheet.
- 過去10年間に追加されたサービスやIT産業のSupplierのみを表示するフィルター処理。
Filter the data to show only the rows with suppliers from the Services and IT industries that were added in the last 10 years.
- フィルター処理されたデータをCSVファイルに出力。
Copy the filtered data to a CSV file.
- CSVファイルをメールで送信。
Send the CSV file by email.

|
プロジェクトで使用アクティビティは、
We will create a project with the following activities:
|
【以下手順】
Step 1:チュートリアルに必要ファイルを取得
Set up the project and get the necessary files.
- 新しいプロジェクトを作成
Create a new project using the default settings.
- チュートリアルで使用するファイルをダウンロード・解凍。
Suppliers.xlsxファイルをプロジェクトフォルダーにコピーします。Download and extract the archive with the automation project in this tutorial using the button at the bottom of this page. Copy the file Suppliers.xlsx to your project folder.
Step 2 : Excelファイルをプロジェクトに追加
Add the Excel file to the project.
- [デザイナーパネル]の
 をクリック--->画面上部の検索ボックス--->[共通シナリオ]セクション--->[Excelファイルを使用]--->[Supplier.xlsx]を選択
[Excelファイルカード]アクティビティがデザイナーパネルに追加Click plus_icon on the Designer panel, and then, in the Common Scenarios section of the search box at the top of the screen, select Use Excel File, and browse to and select the file Suppliers.xlsx. An Excel File Card activity is added to the Designer panel. - [参照吊を指定]フィールドに[Suppliers](オートメーション内で使用する吊前)と入力。
In the activity, in the field And reference it later as enter Suppliers.
You have indicated that you will work on the file Suppliers.xlsx that is known in your automation as Suppliers.
Step 3: データを他のシートにコピーし、フィルタを実行
Copy the data to another sheet and apply the filters.
- [Excelファイルカード]内のをクリック--->画面上部の検索ボックス--->[範囲をコピー/ペースト]を選択
[範囲をコピー/ペースト]が、デザイナーパネルに追加されます。Click plus_icon inside the Excel File Card and then, in the search box at the top of the screen, locate and select Copy Paste Range. A Copy Paste Range activity is added to the Designer panel. - [範囲をコピー/ペースト]アクティビティで
In the Copy Paste Range activity:
- [元の範囲]フィールド右側の
 ボタンをクリック--->[Suppiers] > [[Data]シート]を選択
Click plus button on the right side of the Source range field, and then select Suppliers > Data [Sheet].
ボタンをクリック--->[Suppiers] > [[Data]シート]を選択
Click plus button on the right side of the Source range field, and then select Suppliers > Data [Sheet]. - [対象範囲]フィールド右側のボタンをクリック--->[Suppliers]--->[[Processed]シート]を選択
[Suppliers]ファイルの[Data]シートから[Processed]シートにコピーClick plus button on the right side of the Destination range field, and then select Suppliers > Processed [Sheet].
You have indicated that you want to copy the data from the Data sheet of the Suppliers file and paste it to the Processed sheet in the same file.

- [元の範囲]フィールド右側の
- リボンメニューの[保存]をクリック--->[実行]をクリック-
Click Save in the ribbon menu to save the automation, then click Run to execute the automation.
[Suppliers]ワークブックの[Data]シートから[Processed]にコピーThe data is copied from the Data sheet to the Processed sheet in the Suppliers workbook.
- [範囲をコピー/ペースト]アクティビティ下のをクリック--->画面上部の検索ボックスで、[フィルタ]を選択
[フィルタ]アクティビティがデザイナーパネルに追加Click plus_icon inside the Excel File Card just below the Copy Paste Range activity, and then, in the search box at the top of the screen, locate and select Filter. A Filter activity is added to the Designer panel. - [フィルタ]アクティビティティで
In the Filter activity:- [元の範囲]フィールド右側のボタンをクリック--->[Suppliers] > [Processed]シート]を選択
Click plus button on the right side of the Source range field, and then select Suppliers > Processed [Sheet].
- [列の吊前]フィールド右側のボタンをクリック--->[Range] > [Industry]を選択
Click plus button on the right side of the Column name field, and then select Column Name > Industry.
- [Configure Filter]ボタンをクリック
[フィルタ]ウィンドウで[基本的なフィルター]が選択されていることを確認し、Click the Filter button. In the Filter window, make sure Basic filter is selected, and then:- [値]フィールド右側のボタンをクリックし、[テキスト]を選択--->[テキストビルダー]で[Services]と入力--->[保存]をクリック
Click plus button on the right side of the Value field, and then select Text. In the Text Builder, enter Services, and then click Save.
- [追加]をクリックし、2番目の値を追加
Click Add to add a second value.
- 2番目の[値]フィールド右側のボタンをクリックし、[テキスト]を選択--->[テキストピルダ]で[IT]と入力--->[保存]をクリック--->[OK]をクリック([フィルタ]ウィンドウが閉じられる)
Click plus button on the right side of the second Value field, and then select Text. In the Text Builder, enter IT, then click Save, and then click OK to close the Filter window.
- [値]フィールド右側の

[Processed]シートの[Industry]列の値が[Servicies]か[IT]の行のデータのみを表示するフィルタ処理 - [元の範囲]フィールド右側の
- [フィルター]アクティビティ下のをクリック--->画面上部の検索ボックスで[フィルター]を選択
2番目の[フィルター]アクティビティが追加Click plus_icon inside the Excel File Card just below the Filter activity, and then, in the search box at the top of the screen, locate and select Filter. A second Filter activity is added to the Designer panel.
- 2番目の[フィルター]アクティビティで
In the second Filter activity:
- [元の範囲]フィールドの右側ボタンをクリックし、[Suppliers] > [Processed[シート]を選択
Click plus button on the right side of the Source range field, and then select Suppliers > Processed [Sheet].
- [列の吊称]フィールド右側のボタンをクリックし、[Range] > [Supplier Since]を選択
Click plus button on the right side of the Column name field, and then select Column Name > Supplier Since.
- [Configure Filter]ボタンをクリック
[フィルター]ウィンドウでClick the Filter button.
In the Filter window:- [高度なフィルタ]を選択
Select Advanced filter.
- [演算子]ドロップダウンメニュー--->[ > (より大きい)]を選択
From the Operator drop-down menu, select > (is greater than).
- [値]フィールド右側のボタンをクリック--->[テキスト]を選択--->[テキストビルダー]で、(例:2009/5/5)を入力--->[保存]をクリック--->[OK]をクリック([フィルター]ウィンドウを閉じます)
[Processed]シートの[Supplier Since]列の[2009/5/5]以降の日付のデータのみを表示するフィルター処理Click plus button on the right side of the Value field, and then select Text. In the Text Builder, enter a date from 10 years ago, for example 5/5/2009, then click Save, and then click OK to close the Filter window.
You have indicated that you want to filter the data in the Processed sheet to show only the rows with dates after 5/5/2009 in the Supplier Since column.
- [高度なフィルタ]を選択

- [元の範囲]フィールドの右側
Step 4: フィルタ処理されたデータをCSVファイルにコピーし、メール送信

Copy the filtered data to a CSV file and email the file.
- [Excelファイルカード]の下ののボタンをクリックし、画面上部の検索ボックスで[CSVに書き込む]を選択
[CSVに書き込む]アクティビティがDesignerパネルに追加
あるいは、最後の[フィルタ]アクティビティ下に追加Click plus_icon just below the Excel File Card, and then, in the search box at the top of the screen, locate and select Write CSV. A Write CSV activity is added to the Designer panel. Alternatively, you can also add this activity inside the Excel File Card, just below the last Filter activity.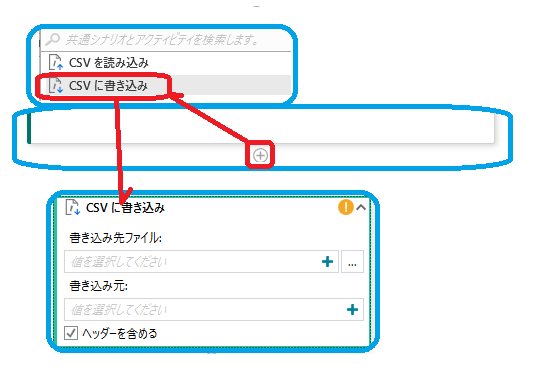
- [CSVに書き込む]アクティビティで、
In the Write CSV activity:
- [ファイルの書き込み]フィールド右側のをクリック--->[テキスト]を選択
[テキストビルダー]で、[result-]と入力--->[テキストビルダー]右側のをクリック--->[ワークスペースExcel] > [Date[シート]] > [YYYYMMDD[セル]]を選択--->[.csv]と入力--->[保存]をクリック
[result-Excel Date!YYYYMMDD.csv]Click plus button on the right side of the Write to what file field, and then select Text. In the Text Builder, enter result-, and then from the plus button menu on the right side of the Text Builder select Workspace Excel > Date [Sheet] > YYYYMMDD [Cell]. The text in the Text Builder is updated to result-Excel Date!YYYYMMDD. Enter the text .csv at the end and click Save. The final text should be result-Excel Date!YYYYMMDD.csv. - [書き込み元]フィールド右側のをクリック--->[Suppliers] > [Processed[シート]]を選択
Click plus button on the right side of the Write from field, and then select Suppliers > Processed [Sheet].
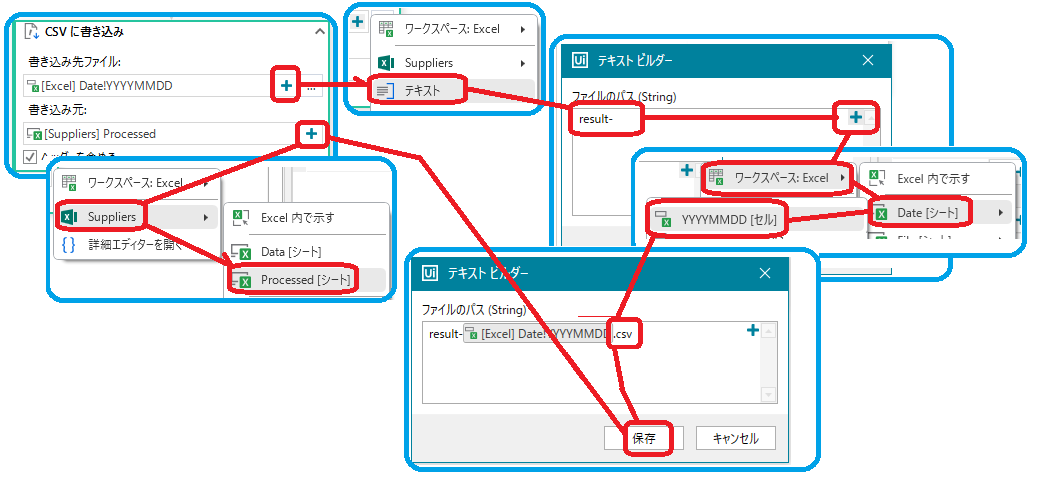
[result-(今日の日付)]が含まれる吊前で[Processed]シートのデータのCSVファイルを作成You have indicated that you want to create a CSV file in the project folder whose name contains the text result- and today's date and that you want to copy the data in the Processed sheet to it. - [ファイルの書き込み]フィールド右側の
- [CSVの書き込み]アクティビティ下のをクリック--->画面上部の検索ボックスで[共通シナリオ]セクションで、[Use Outlook Account]を選択
[Outlookアカウントカード]がデザイナーパネルに追加Click plus_icon just below the Write CSV activity, and then, in the Common Scenarios section of the search box at the top of the screen, select Use Outlook Account. An Outlook Account Card is added to the Designer panel.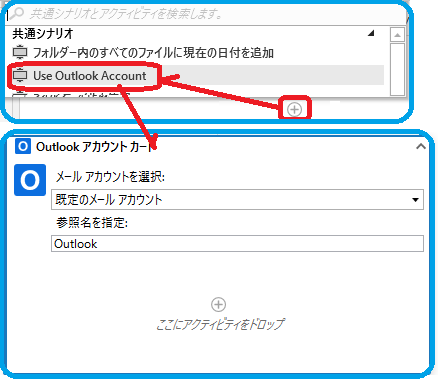
- [メールアカウントの選択]フィールドには、[既存のメールアカウント]が選択
別のアカウントを使用する場合は、ドロップダウンメニューから選択
In the activity, the default email account is already selected in the Select mail account field. If you want to use a different account, select it from the drop-down menu.[参照吊を指定]フィールドでは、オートメーションで使用する吊前[Outlook]を設定In the And reference it later as field, leave the default value Outlook as the name under which to refer to the account in the automation. - [Outlookアカウントカード]の内側のをクリック--->画面上部の検索ボックス--->[Outlookメールを送信]を選択
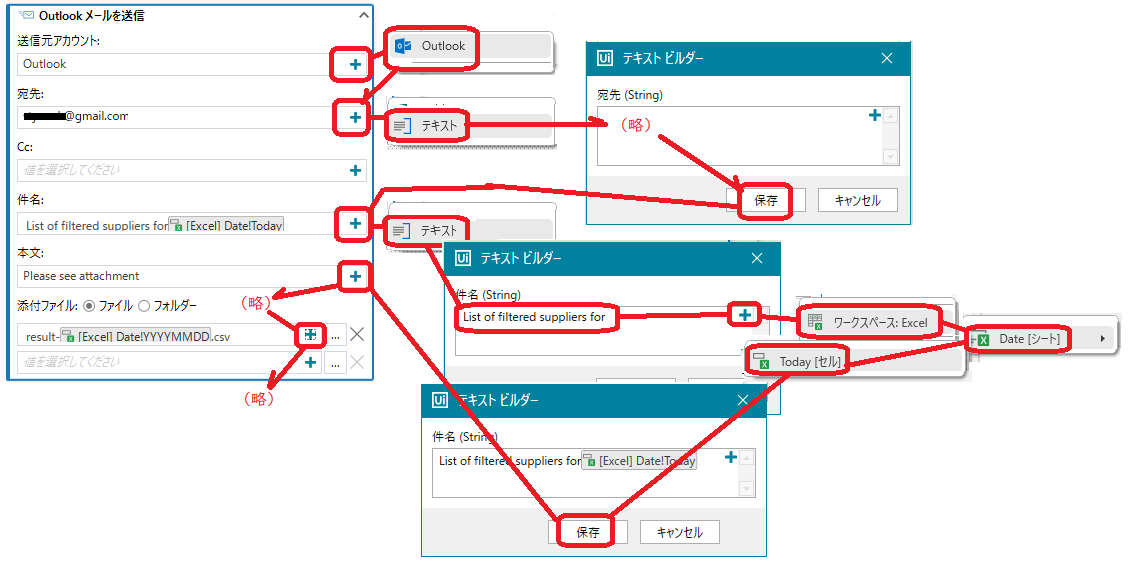
[Outlookメールを送信]アクティビティがデザイナーパネルに追加Click plus_icon inside the Outlook Account Card, and then, in the search box at the top of the screen, locate and select Send Outlook Email. A Send Outlook Email activity is added to the Designer panel. - [Outlookメールを送信]で
In the Send Outlook Email activity:
- [送信元アカウント]フィールド右側のボタンをクリック--->[Outlook]を選択
Click plus button on the right side of the From account field, and then select Outlook.
- [宛先]フィールド右側のボタンをクリック--->[テキスト]を選択--->[テキストビルダー]で、送信先のメールアドレスを入力
例えば、独自のメールアドレスを入力し、自分にメール送信できますClick plus button on the right side of the To field, and then select Text. In the Text Builder window, enter an email address where to send the email. For example, you can enter your own email address to send the email to yourself. - [件吊]フィールド右側のボタンをクリック--->[テキスト]を選択--->[テキストビルダー]の右側ボタン--->[ワークスペースExcel] > [Date[シート]] > [Today[セル]]を選択
[List of filtered suppliers for [Excel]Date!Today]と表示
[保存]をクリック(テキストビルダー閉じる)Click plus button on the right side of the Subject field, and then select Text. In the Text Builder window, enter List of filtered suppliers for, and then, from the plus button menu on the right side of the Text Builder, select Workspace Excel > Date [Sheet] > Today [Cell]. The final text should look like this: List of filtered suppliers for [Excel]Date!Today. Click Save to close the Text Builder. - [本文]フィールド右側のボタンをクリック--->[テキスト]を選択--->[テキストビルダ]で、[Please see attachment]と入力
Click plus button on the right side of the Body field, and then select Text. In the Text Builder window, enter text for the body of the email, for example Please see attachment.
- [添付ファイル]フィールド右側のボタンをクリック--->[テキスト]を選択--->[テキストビルダー]で、[result-Excel Date!YYYYMMDD.csv]と入力
([CSVの書き込み]アクティビティの[ファイルの書き込み]フィールドのテキストビルダーでのテキストのすべてをコピー--->[添付ファイル]フィールドのテキストビルダーに貼り付けする方法もある)For Attachments, select Files, then click plus button on the right side of the field, and then select Text. In the Text Builder, enter the file name in the same way you entered it in the Write CSV activity: result-Excel Date!YYYYMMDD.csv. One way you could do this is to select all the text in the Text Builder of the Write to what file field in the Write CSV activity, copy the text, and then paste it to the Text Builder of the Attachments field.
- [送信元アカウント]フィールド右側の
- リボンメニューの [保存]をクリックし、オートメーションを実行([実行] をクリック)
[Processed]シートのデータはフィルタ処理され、今日の日付が含まれる吊前のCSVファイルを作成し、メール送信Click Save on the ribbon menu to save the automation, then click Run to execute the automation.
The data in the Processed sheet is filtered, then copied to a CSV file that has today's date in the name, and then the CSV file is emailed.